

-
 Original price $27.50 - Original price $27.50Original price$27.50$27.50 - $27.50Current price $27.50
Gutter Tongs 45cm - Stainless Steel Gutter Cleaning Tool for Downpipes & Gutters
SKU XPRTGTONG45XPRT TOOLSExtra-Long Stainless Steel Gutter Tongs (45cm) – Maximum Reach for Deep Gutter Cleaning Achieve maximum reach and clear deep gutter runs effortless...
View full detailsOriginal price $27.50 - Original price $27.50Original price$27.50$27.50 - $27.50Current price $27.50 -
 Original price $15.00 - Original price $15.00Original price$15.00$15.00 - $15.00Current price $15.00
XPRT Yellow Brick | 0000 Steel Wool Holder for Window Cleaning Poles
SKU XPRTYBXPRT TOOLSYellow Brick – Steel Wool Holder Block for Window Cleaning Poles Revolutionize high-reach detail cleaning and stubborn mark removal with the Yellow...
View full detailsOriginal price $15.00 - Original price $15.00Original price$15.00$15.00 - $15.00Current price $15.00 -
 Original price $16.50 - Original price $16.50Original price$16.50$16.50 - $16.50Current price $16.50
Fly Screen Remover Tool - For Window Cleaners
SKU XPRTFSRXPRT TOOLSFly Screen Removal Tool – Glass-Filled Plastic Flyscreen Pry Tool Eliminate frame damage, torn mesh, and job site frustration with the purpose-buil...
View full detailsOriginal price $16.50 - Original price $16.50Original price$16.50$16.50 - $16.50Current price $16.50 -
 Original price $198.00 - Original price $198.00Original price$198.00$198.00 - $198.00Current price $198.00
Louvre Pro Kit - Complete Louvre Window Cleaning Kit for Pro Window Cleaners
SKU XPRTLPKXPRT TOOLSLouvre Pro Kit – Complete Louvre Window Cleaning Kit for Pro Window Cleaners Transform tedious, time-consuming glass louvre maintenance into a rapi...
View full detailsOriginal price $198.00 - Original price $198.00Original price$198.00$198.00 - $198.00Current price $198.00 -
 Original price $49.00 - Original price $49.00Original price$49.00$49.00 - $49.00Current price $49.00
Louvre Mop 102mm - Microfibre Louvre Window Cleaning Mop for Window Cleaners
SKU XPRTLM102XPRT TOOLSXPRT 102mm Microfibre Louvre Window Cleaning Mop Transform tedious louvre window cleaning into a fast, effortless operation with the XPRT 102mm Mic...
View full detailsOriginal price $49.00 - Original price $49.00Original price$49.00$49.00 - $49.00Current price $49.00 -
 Original price $55.00 - Original price $55.00Original price$55.00$55.00 - $55.00Current price $55.00
Louvre Mop 152mm - Microfibre Louvre Window Cleaning Mop for Window Cleaners
SKU XPRTLM152XPRT TOOLSXPRT 152mm Microfibre Louvre Window Cleaning Mop Transform tedious louvre window cleaning into a fast, effortless operation with the XPRT 152mm Mic...
View full detailsOriginal price $55.00 - Original price $55.00Original price$55.00$55.00 - $55.00Current price $55.00 -
 Original price $70.00 - Original price $70.00Original price$70.00$70.00 - $70.00Current price $70.00
Louvre Gun - Louvre Window Cleaning Tool for Professional Window Cleaners
SKU XPRTLRG2XPRT TOOLSLouvre Gun – Louvre Window Cleaning Tool for Professional Window Cleaners Transform dread-filled louvre window maintenance into a fast, streak-free...
View full detailsOriginal price $70.00 - Original price $70.00Original price$70.00$70.00 - $70.00Current price $70.00 -
 Original price $17.50 - Original price $17.50Original price$17.50$17.50 - $17.50Current price $17.50
XPRT Grip Clip - Ladder Stability Tool for Window Cleaners and Gutter Cleaners
SKU XPRTGCLONGXPRT TOOLSXPRT Grip Clip – Ladder Stability Tool for Window & Gutter Cleaners Enhance job site safety and prevent dangerous ladder slips with the XPRT Gr...
View full detailsOriginal price $17.50 - Original price $17.50Original price$17.50$17.50 - $17.50Current price $17.50 -
 Original price $14.50 - Original price $14.50Original price$14.50$14.50 - $14.50Current price $14.50
Louvre Mop Sleeve - Large Replacement (152)
SKU XPRTLMPAD152XPRT TOOLSXPRT Louvre Mop Microfibre Replacement Sleeve – Large (152mm) Keep your specialized louvre window cleaning operations running at maximum efficiency...
View full detailsOriginal price $14.50 - Original price $14.50Original price$14.50$14.50 - $14.50Current price $14.50 -
 Original price $12.00 - Original price $12.00Original price$12.00$12.00 - $12.00Current price $12.00
Louvre Mop Sleeve - Small Replacement (102) - 10 Pieces
SKU XPRTLMPAD102XPRT TOOLSXPRT Louvre Mop Microfibre Replacement Sleeve – Small (102mm) Keep your specialized louvre window cleaning operations running at maximum efficiency...
View full detailsOriginal price $12.00 - Original price $12.00Original price$12.00$12.00 - $12.00Current price $12.00 -
 Original price $5.00 - Original price $5.00Original price$5.00$5.00 - $5.00Current price $5.00
Louvre Gun Replacement Tips, Fits Standard Louvre Glass
SKU XPRTLGT63XPRT TOOLSLouvre Gun Replacement Tips (Fits Standard 6.3mm Louvre Glass) Restore your window cleaning tools to peak performance with genuine Louvre Gun Repla...
View full detailsOriginal price $5.00 - Original price $5.00Original price$5.00$5.00 - $5.00Current price $5.00 -
 Original price $4.50 - Original price $4.50Original price$4.50$4.50 - $4.50Current price $4.50
Snap Wrap - Silicone Cable and Hose Strap for Window Cleaners and Tradies
SKU XPRTSWXPRT TOOLSSnap Wrap – Silicone Cable and Hose Strap for Window Cleaners and Tradies Keep your essential trade gear under complete control with the Snap Wrap ...
View full detailsOriginal price $4.50 - Original price $4.50Original price$4.50$4.50 - $4.50Current price $4.50


Collection Description
How To Use
Pick your product below to jump straight to its instructions.
How to use the Louvre Gun
The Louvre Gun rinses louvre windows fast with pure water. Follow these steps for a clean, spot-free finish every time.
🔧 Step 1 — Set up and prepare
- Connect an 8mm hose to the base of the gun and make sure it's tight with no leaks.
- Test the flow away from the window to check the pressure.
- Lay towels or a drop sheet under the louvres to catch drips.
- Pressure check: point the tip up and squeeze. A gentle bubble is right; a high jet means the pressure needs turning down.
- Pure water: your TDS meter should read 000 ppm for spotless glass.
- Heads up: pressure builds whenever the flow stops, so expect a short burst when you restart.
🧽 Step 2 — Wash the louvres
- Scrub 3–4 blades at a time with a wet Louvre Mop.
- Doing too many at once lets water dry on the glass and leave cloudy marks.
💦 Step 3 — Rinse with the Louvre Gun
- With the louvres almost closed, start at the top centre of each blade and sweep side to side so water covers the whole pane.
- Work one blade at a time, top to bottom.
- Leave the blades slightly open — close to vertical so they drain, but not touching so air can flow.
🧠 Quick reminders
- Test the spray before aiming at glass.
- Work in small sections, out of direct sun.
- Rinse thoroughly for a streak-free result.
- Sticky trigger? Remove the end cap under the trigger, take out the spring and pin, add a little silicone tap grease to the pin and reassemble. Don't use WD-40 or petroleum grease.
↑ Back to top
How to use the Louvre Mop
A purpose-built tool for cleaning louvre blades safely and efficiently.
🔍 Step 1 — Check the pad
- Run your fingers over the microfibre to feel for grit, sand or sharp bits.
- Trapped particles can scratch glass, especially tinted or coated louvres.
- Clean or replace the pad if it feels rough or looks dirty.
💧 Step 2 — Wet the mop
- Dip or spray the pad with clean water.
- Add a little detergent only for very dirty or greasy glass.
- Less soap = less rinsing and a cleaner finish.
🧼 Step 3 — Clean the blades
- Wipe 3–4 blades at a time, back and forth several times, working top to bottom.
- Don't forget the small blade holders at each end.
- Wipe the surrounding frame too if needed.
🚿 Step 4 — Clean the pad after use
- Rinse the pad well to flush out dirt.
- Machine wash it now and then:
- Pull one end firmly to peel it off the frame.
- Gentle cycle, mild detergent.
- ❌ No fabric softener — it reduces microfibre performance.
- ✅ Air dry only, no tumble drying.
🔄 Step 5 — Refit the pad
- Fold the pad with the blue sides together, one side a little longer than the other.
- Hold a thin, flexible plastic card against the white side.
- Slide card and pad into the frame, shorter side first, and push all the way in.
- Pull the card out — the Velcro grips the pad and you're ready to go.
🧠 Reminders
- Check the pad for debris before every use.
- Use little or no detergent.
- Wash regularly, never with fabric softener.
- Store dry and out of direct sun.
↑ Back to top
How to use the Grip Clip
A quick way to secure your ladder and hose to the gutter so you can work with confidence.
⚠️ Warning — not a fall-protection device Set your ladder at the correct angle (1:4) on stable footing. Use only on secure gutters, and not where a gutter or leaf guard stops the clip gripping fully. Rebounding hooks can cause serious eye injury: place hooks carefully, keep your face and body out of the rebound path, don't overstretch, and don't use a cord that shows wear or damage.
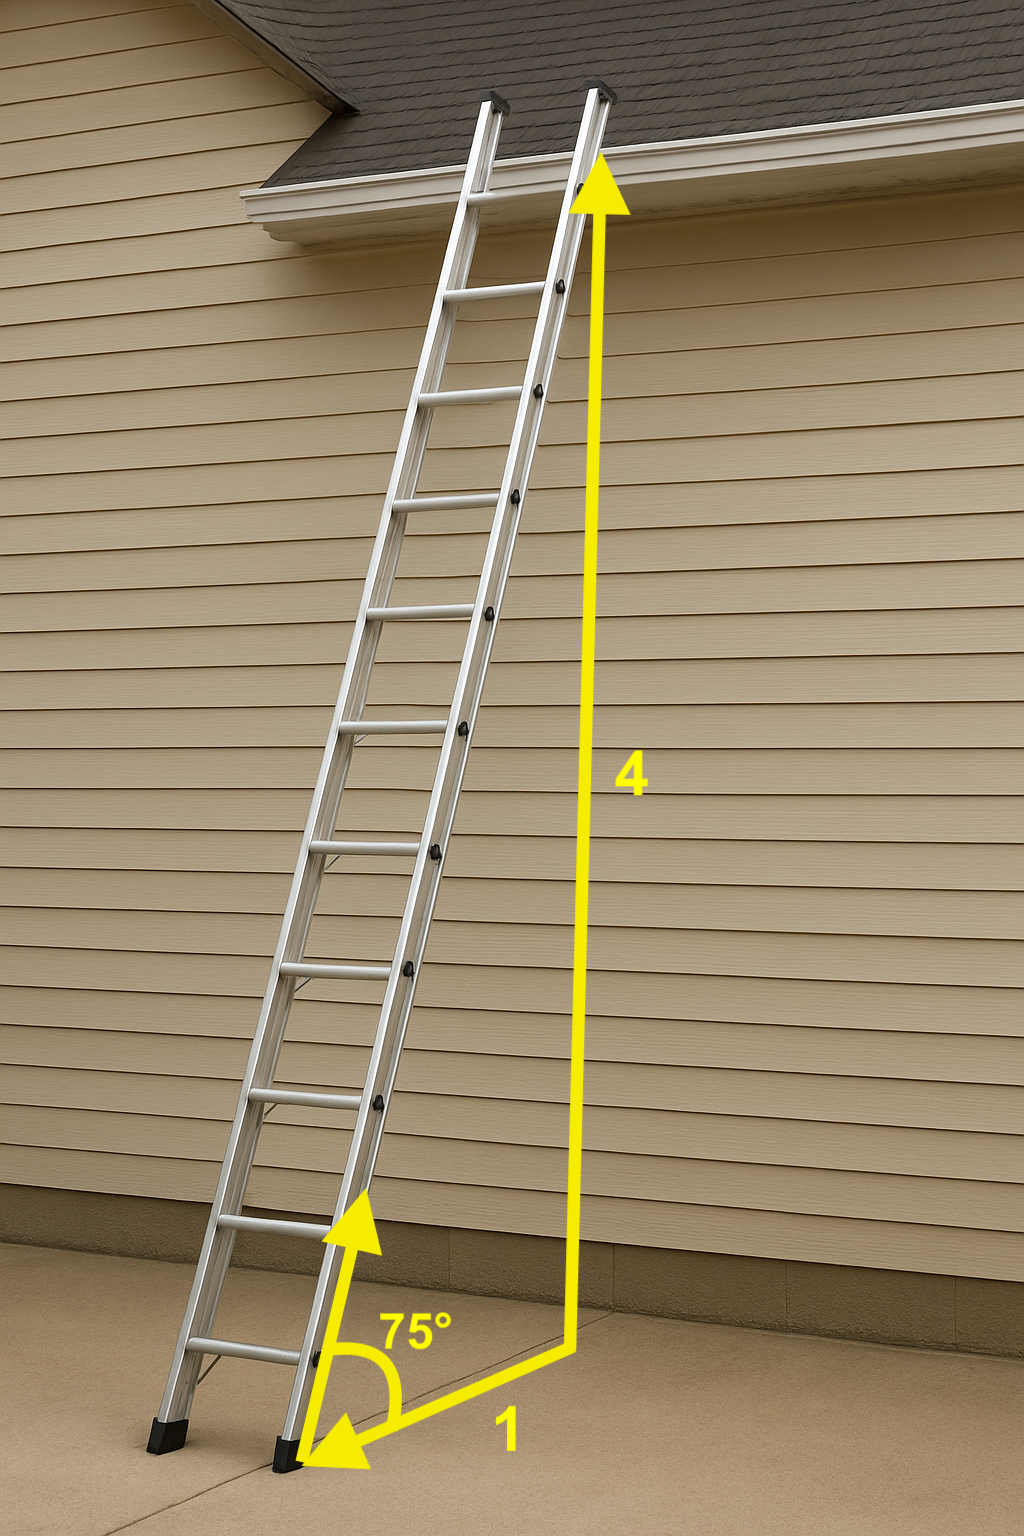
🪜 Step 1 — Position your ladder
- Rest the ladder on the gutter, extending at least 1 m above the gutter or roof edge (see SafeWork NSW ladder guidance).
- Make sure the feet are stable and the angle is about 75° (1:4).
🔗 Step 2 — Attach the clip
- Climb until you can reach the front lip of the gutter. Open the spring clip and close it over the gutter edge just outside the ladder.
- Stretch the cord across to the other side, wrapping it once around the rung just above the gutter so it isn't a trip hazard.
- Clip the second clamp onto the gutter on the other side. The tension helps stop the ladder sliding sideways or tipping back.
📿 Step 3 — Remove and store
- Unclip both sides to remove.
- Clip it to your belt, tool bag or collar, or wear the cord around your neck like a lanyard.
🧠 Key reminders
- Check the clips and cord before every use.
- Replace the cord at the first sign of wear.
- The Grip Clip reduces ladder movement — it doesn't replace a safe ladder setup or common sense.
↑ Back to top
How to use the Yellow Brick
A foam holder for 0000 grade steel wool, for removing hard water marks and detailing glass — by hand or on a pole.
🧶 Step 1 — Fit the steel wool
- Tuck a pad of genuine 0000 steel wool (sold separately) under the elastic, hooked around the corners.
- The slits in the foam help the elastic sit in place.
- The wool should lie flat on the face of the Brick.
- Use only genuine 0000 grade — never a rusty or dirty pad.
🪢 Step 2 — By hand or on a pole
- By hand, the foam block is much easier to hold than loose wool, so you can work longer.
- On a pole, push the tapered socket firmly onto any standard pole tip — no adaptor needed.
- Reach skylights and high glass from the ground.
💧 Step 3 — Wet or dry
- Dry for light detailing and touch-ups.
- Wet for hard water marks, stubborn spots and big areas — squeegee off when finished.
⚠️ Before you start Check the glass type — tinted and Low-E coated glass need extra care. Wet steel wool can rust within hours, and rusty wool can scratch glass, so always start with a fresh pad.
Buy Yellow Brick↑ Back to top
Frequently Asked Questions